Jelly-Light
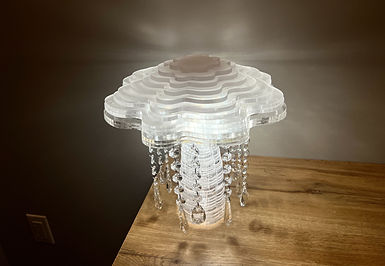
I created a functional and visually compelling lamp inspired by the elegance and fluidity of jellyfish.
The project focused on leveraging material properties and exploring innovative manufacturing techniques. Inspired by the Eames' approach, I aimed to combine user needs with material creativity to design a dual-purpose lamp that serves as both a light source and a jewelry display.

Team
Solo
Tools
Laser cutter,
Rhino, Slicer for Fusion 360
other craft tools
Timeline
15 weeks
Objective
For my industrial design coursework, we studied leveraging material and manufacturing properties, drawing inspiration from the Eames' approach of combining user needs with innovative use of materials and manufacturing techniques.
Inspirations:


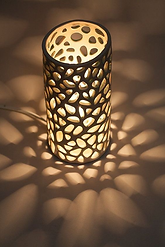
I drew inspiration from various desk lamps that create interesting shadows and play with translucency and thickness. This led me to explore how different materials can manipulate light, particularly to mimic the jellyfish's ethereal, translucent body.

Why jellyfish?
The ocean has always been a source of inspiration for me, and the jellyfish’s form felt like a natural and symbolic choice, as it harmonizes the lamp’s purpose with biomimetic design.
← this me & (not a jelly)fish
Material 1: Cardboard
Aim: Explore cardboard’s material qualities, focusing on sustainability and recyclability.


I selected corrugated cardboard for its accessibility, eco-friendliness, and potential for reuse. I wanted to understand its material properties better. I also looked into how it works with light. Cardboard’s opacity and structure allowed me to test basic forms and lighting placements.

The light source was a simple push light for ease of testing and adjustability.
Using CorelDraw, I sketched a jellyfish-inspired form and laser-cut the cardboard to create my first mock-up.


One challenge emerged: I needed a way to easily access the light for adjustments or replacement

I tried cutting the jellyfish, making the top of the lamp a removable “cap" and it works - I can easy get the push light in and out so easily!
For my next iteration, I separated the top of the jellyfish from the base, so that light can easily be accessed


Finished mockup!


This initial prototype helped me identify core areas for improvement: refining the lighting mechanism, enhancing structural integrity, and achieving a softer, diffused glow.

Structural stability
The cardboard model was flimsy and allowed excessive light to escape through unintended gaps, creating a less cozy feel.
Manufacturing
The structure needs additional reinforcement, however this would mean more parts and more assembly...something to consider...
Material 2: Clear acrylic
Aim: Recognizing cardboard’s limitations, I transitioned to clear acrylic for its transparency, durability, and potential to mimic jellyfish-like translucency. This material shift enabled a refined exploration of biomimicry and allowed me to achieve an aesthetic closer to a real jellyfish body.
How can we apply biomimicry in design to the jellyfish lamp to create a cozy, aesthetic environment?
Persona
By adopting biomimicry principles, I aimed to create an environment that felt cozy yet sophisticated. I envisioned the lamp as part of a nature-inspired room decor, appealing to users who value both aesthetics and functionality.


I modeled a slim, stable base in Rhino to ensure the lamp’s stability.
Tentacles were reimagined to function as jewelry hooks, adding a multi-functional aspect to the design.
Light socket?
I considered using a socket light with a switch for user convenience and consulted my professor. The jewelry-display functionality was particularly well-received, sparking further refinements in the lamp’s form.

Symmetrical


Initially, the top of the jellyfish was dome-shaped, then I decided to go for a symmetrical flower-like shape
Asymmetrical
After feedback, I opted for a more organic, shape with slight asymmetry to capture a natural aesthetic. This shape added a dynamic, lifelike element to the lamp.


Research into desk lamp ergonomics revealed an optimal height of 15-20 inches for workspace lighting. This insight guided my final dimensions, ensuring that Jelly-Light would provide adequate light coverage without causing glare or discomfort.
More iterations are done on Rhino3D, as I researched more into specifications of the map for a suitable dimension on our users desk.


Using Slicer for Fusion 360, I segmented the design into layers for laser cutting. I then assembled the structure using an acrylic solvent for a seamless finish.
Sand blast


To reduce glare and create a soft, diffused glow, I sandblasted the acrylic for a frosted effect, allowing light to emit gently and evenly.
Final design

Light up!
Light down...

Jelly-Light serves as both a lamp and a jewelry hanger, bringing an organic element to room decor. Jewelry pieces can be draped over the tentacle-like hooks, symbolizing the graceful movement of jellyfish tentacles
The Jelly-Light project was a journey through material experimentation, user-centered design, and biomimicry. In the future, I would consider further refining the assembly process to enhance durability and ease of use. Additionally, I would explore customizable light settings, perhaps integrating a dimmable switch to allow for different lighting moods, and experimenting with more durable, eco-friendly materials.
Key Takeaways
The more mockups the better!
Seeing things on the CAD screen is not the same as when built physically. Building a physical mockup (even a scaled down small one) helps identify potential improvement spots. And keep iterating!
Consider mass manufacturing
Though not focused on mass production, it is something I would keep in mind moving forward - in terms of material use, manufacturing, assembly methods, packaging and weight.